Curriculum
E-Marketing Tools & Applications
E3B. Common HTML Elements
Introduction
HTML5 — the most current version of HTML — comprises many elements. This lesson will cover some of the most significant ones and their properties. Specifically, this lesson will cover the following topics:
- Paragraphs
- Headings
- Comment Tag
- Attributes
- Links
- Lists
- Images
- Tables
- Semantic Elements
- Div and Span
HTML Paragraphs
We saw earlier how the HTML <p> element defines a paragraph. Typically, a paragraph generates output starting on a new line, with some white space before and after it. Additionally, the paragraph content will dynamically adjust its width (the horizontal dimension) to fit the width of the browser window where the web page is displayed. How the paragraph is displayed depends entirely on the screen it appears on. An important thing to remember about HTML is that multiple spaces in the source code collapse to a single space in the output. Similarly, line breaks in the source code will not appear in the output. To create line breaks in the output, we must use the tag <br>, as seen in a previous lesson. Look at the three different ways of writing code for the same paragraph below.
Case 1
<p>Now we are engaged in a great civil war, testing whether that nation, or any nation so conceived and so dedicated, can long endure. We met on a great battlefield of that war. We have come to dedicate a portion of that field as a final resting place for those who here gave their lives that the nation might live. It is altogether fitting and proper that we should do this.</p>
Case 2
<p>
Now we are engaged in a great civil
war, testing whether that nation,
or any nation so conceived
and so dedicated, can long endure.
We are met on a great battlefield
of that war. We have come to dedicate
a portion of that field, as a final
resting place for those who here
gave their lives that the nation might
live. It is altogether fitting and
proper that we should do this.
</p>
Case 3
<p>
Now we are engaged in a great civil war,
testing whether that nation,
or any nation so conceived
and so dedicated, can long
endure. We are
met on a great battlefield of that war.
We have come to dedicate a portion of
that field, as a final
resting place for those who here
gave
their
lives
that the
nation might live. It is altogether
fitting and proper that we should do this.
</p>
The three preceding cases will result in identical output: multiple consecutive spaces will collapse into a single space, and line breaks in the source code will not affect how the output is displayed. The number of lines in the output paragraph will depend on the browser window size. If you resize the browser window, the number of lines in the paragraph will change.
Always Remember the End Tag
When writing code, we must never forget to include the end tag. Writing code like the following snippet can result in errors.
<!DOCTYPE html>
<html>
<body>
<p>This is a paragraph.
<p>This is a paragraph.
</body>
</html>
HTML Headings
Headings and subheadings are placed on a page as titles and subtitles for sections, usually followed by the paragraphs beneath them. In HTML, there are six levels of headings, and they are coded as follows:
<h1>Heading level 1</h1>
<h2>Heading level 2</h2>
<h3>Heading level 3</h3>
<h4>Heading level 4</h4>
<h5>Heading level 5</h5>
<h6>Heading level 6</h6>
The output of the preceding code would look something like this:
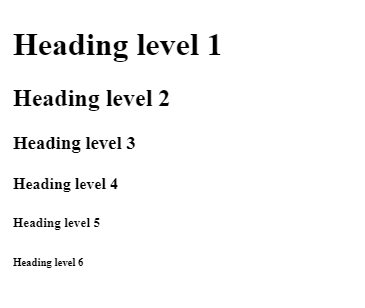
Usually, each heading level is followed by paragraphs or other content. The purpose of headings is to organize the content into meaningful sections and subsections.
HTML Comment Tag
While writing code, we may often wish to add a “comment” alongside our code. The browser does not display comments. We use them to store explanatory notes, reminders, and other useful information. The following demonstrates the use of comments.
<!DOCTYPE html>
<html>
<body>
<!– This is a comment. Remember to add relevant information in the paragraph below. –>
<p>This is the first paragraph.</p>
<p>This is the second paragraph.</p>
<!–
This is
a multiline
comment.
–>
</body>
</html>
Comments can be used to hide content. Often, we may want to temporarily hide some code. An example is listed below.
<p>This is the first paragraph.</p>
<!–
Remember to insert the code for the image below after the client sends it. Then, uncomment this part.
<p>Look at this pretty picture:</p>
<img src=”flower.jpg” border=”0″ alt=”Roses in bloom”>
–>
Comments can be written in the middle of the content as well. See the example below.
<p>This <!– insert color here (is it yellow or pink?) –> flower blooms only in the summer months.</p>
After confirming that the flower is yellow, we can replace the code with the following.
<p>This yellow flower blooms only in the summer months.</p>
HTML Attributes
All HTML elements can have attributes, and some elements are useless without them. Attributes provide additional information that configures elements’ appearance, values, or behaviors. Consider the following code snippet.
<p style=”color:green;”>This paragraph will have green characters.</p>
In the preceding code, the element p has been given the attribute style. The value of that attribute is color: green;. The following code snippet will align the paragraph to the right edge of the browser window.
<p style= “text-align: right;”>This paragraph will stick to the right edge of the browser window.</p>
Next, we look at the code that displays all the characters in the paragraph in red and centers the paragraph between the browser window’s left and right edges.
<p style=”text-align: center; color: red; font-family:Verdana;”>
Centered paragraph with red text and Verdana font.
</p>
In the preceding example, the following can be seen: The element p has the attribute style, whose value is text-align: center; color: red; font-family: Verdana;
Important notes:
- The attribute is associated with only the opening tag. The closing tag (in this case, </p>) must be specified as before.
- The value of an attribute must be enclosed in double quotation marks.
- One tag may have multiple attributes (each attribute has its own value specified within quotes).
HTML Links
An example of an element that is useless without an attribute is the <a> anchor tag. This tag is used to create a hyperlink. This is how we create a link:
<p>Visit the <a href=”https://www.unt.edu”>website of the University of North Texas</a>.</p>
In the output for the preceding code, the phrase “website of the University of North Texas” will be underlined. It will also be “clickable,” meaning it will be a link to UNT’s website.
While the <a> tag can have many attributes, the most crucial is href, which specifies the link’s destination URL. For instance, <a href=” https://www.example.com”>Visit Example</a> creates a clickable link that takes the user to the specified URL.
Links can also be customized with the target attribute, allowing you to control how the linked page opens. Setting target=”_blank” opens the link in a new tab or window, providing a better user experience when you don’t want to interrupt the current browsing session. Additionally, anchor links, like <a href=” #section1″>Go to Section 1</a>, are used to navigate within the same page, taking users to specific sections identified by an id attribute.
When creating links, it’s crucial to ensure they are both accessible and meaningful. The text inside the <a> tag, known as anchor text, should clearly describe the link’s destination, providing context for both users and search engines. Well-crafted links contribute to the website’s overall usability and SEO, making them a fundamental element in web design.
HTML Lists
HTML lists are a powerful way to organize and present information in a structured manner, making content more readable and easier to follow. There are two primary types of lists in HTML: ordered lists (<ol>) and unordered lists (<ul>). Each list type serves a specific purpose, depending on the nature of the content being presented.
Ordered lists (<ol>) are used when the sequence of items matters, such as in step-by-step instructions or ranking systems. Each item in an ordered list is automatically numbered, ensuring the order is clear to the reader. For example, a recipe might use an ordered list to outline the steps for preparation:
<ol>
<li>Preheat the oven to 350°F (175°C).</li>
<li>Mix flour, sugar, and eggs in a bowl.</li>
<li>Bake for 30 minutes.</li>
</ol>
Unordered lists (<ul>) are used when the order of items is not significant. Instead of numbers, each item is marked with a bullet point, making it suitable for listing items like ingredients, features, or general information. Here’s an example of an unordered list:
<ul>
<li>Apples</li>
<li>Bananas</li>
<li>Cherries</li>
</ul>
Both ordered and unordered lists are composed of individual list items (<li>), which can contain any type of content, including text, images, or even other lists. This flexibility allows nesting lists, where a list item subsumes another list. Nesting can be particularly useful when creating subcategories or hierarchies within your content. For example, a nested list might look like this:
<ul>
<li>Fruits
<ul>
<li>Apples</li>
<li>Bananas</li>
</ul>
</li>
<li>Vegetables
<ul>
<li>Carrots</li>
<li>Broccoli</li>
</ul>
</li>
</ul>
In this example, “Fruits” and “Vegetables” are the main categories, with their respective items nested underneath. This structure allows readers to easily understand the relationship between items and their subcategories, enhancing the overall clarity of the content.
HTML lists help organize content on a webpage, and they play a critical role in accessibility and SEO. Screen readers interpret lists to help visually impaired users navigate content logically, and search engines often prefer well-structured lists, considering them an indicator of high-quality content. Therefore, using lists appropriately contributes to both user experience and search engine visibility, making them an essential tool in web design.
HTML Images
Images play a crucial role in web design, enhancing a website’s visual appeal and helping convey information more effectively. In HTML, images are embedded into web pages using the <img> tag. It is an instance of a “self-closing tag” tag that does not require a closing counterpart. The <img> tag primarily relies on two critical attributes: src (source) and alt (alternative text).
The img element is not very useful without an attribute. It is the tag used to display an image on a web page. The src attribute of <img> specifies the path to the image to be displayed. It works like this:
<img src=”flower.jpg” alt=”A red rose”>
The image file “flower.jpg” is called upon for display in this case. The alt attribute specifies an alternate text for the image, which is helpful if the image cannot be displayed for some reason.
The src attribute’s value could also be a relative URL pointing to an image stored within a subfolder of the same directory structure as your website. For example:
<img src=” images/photo.jpg” alt=” A beautiful sunset over the mountains”>
The src attribute can be an absolute URL pointing to an image hosted on a remote server, such as:
<img src= “https://www.example.com/images/sunset.jpg” alt= “A scenic view of the beach at sunset”>
In this example:
- src= “https://www.example.com/images/sunset.jpg”: The src attribute contains the full URL to the image hosted on the remote server www.example.com. The browser will fetch the image from this URL and display it on the webpage.
- alt= “A scenic view of the beach at sunset”: The alt attribute provides descriptive text for the image, which is essential for accessibility and search engine optimization.
This format is commonly used when images are hosted on a third-party website or a content delivery network (CDN).
Best Practices for Including Images
When including images on a website, it’s essential to follow best practices to ensure they enhance the user experience without negatively affecting site performance. One of the most critical considerations is image optimization. Large image files can significantly slow down page load times, leading to poor user experience and potentially lower search engine rankings. To avoid this, images should be compressed and resized to appropriate dimensions before uploading to the website. Tools like Photoshop, TinyPNG, IrfanView, and online image optimizers can be used to reduce file sizes while maintaining image quality.
Additionally, using the correct image format is essential. JPEG is usually the best choice for photographs and detailed images due to its balance between quality and file size. PNG is preferred for images with transparent backgrounds or simple graphics, as it supports transparency and typically offers higher quality. SVG is ideal for logos and icons because it is a vector format that scales infinitely without losing quality.
Another best practice is to specify image dimensions using the width and height attributes within the <img> tag. By defining these dimensions, you help the browser allocate space for the image as the page loads, reducing the likelihood of layout shifts that can disrupt the user experience:
<img src=“images/photo.jpg” alt=“A beautiful sunset over the mountains” width=“600” height=“400”>
Moreover, consider using responsive images to ensure your website looks great on all devices, from desktops to mobile devices. The <img> tag supports the srcset attribute, which lets you specify different image files for various screen resolutions. This helps deliver the most appropriate image size based on the user’s device, enhancing performance and usability.
The srcset attribute lets you specify different image sources for different screen sizes or resolutions, ensuring the most appropriate image is loaded for the user’s device. Here’s an example:
<img src=“images/photo-small.jpg”
srcset=“images/photo-small.jpg 480w,
images/photo-medium.jpg 800w,
images/photo-large.jpg 1200w”
sizes=”(max-width: 600px) 480px,
(max-width: 900px) 800px,
1200px”
alt= “A breathtaking view of the mountain range during sunrise”>
In this example:
- src= “images/photo-small.jpg”: This is the default image that will be loaded if the browser does not support the srcset attribute.
- srcset= “images/photo-small.jpg 480w, images/photo-medium.jpg 800w, images/photo-large.jpg 1200w”: The srcset attribute provides a list of image files along with their corresponding widths. The browser will choose the most appropriate image based on the screen’s resolution:
- images/photo-small.jpg 480w: An image that is 480 pixels wide.
- images/photo-medium.jpg 800w: An image that is 800 pixels wide.
- images/photo-large.jpg 1200w: An image that is 1200 pixels wide.
- sizes=”(max-width: 600px) 480px, (max-width: 900px) 800px, 1200px”:
The sizes attribute tells the browser how wide the image will be displayed in different viewport widths.
- (max-width: 600px) 480px: If the viewport is 600 pixels wide or smaller, the browser should use the 480px wide image.
- (max-width: 900px) 800px: If the viewport is between 600px and 900px, the browser should use the 800px wide image.
- 1200px: For viewports wider than 900px, the browser should use the 1200px wide image.
- alt= “A breathtaking view of the mountain range during sunrise”: The alt attribute describes the image for accessibility purposes.
This approach ensures that users across different devices and screen sizes receive an optimized image that matches their devices’ capabilities, improving performance and the user experience.
Finally, images should always be relevant to the content and not used excessively. Overloading a page with images can be distracting and overwhelming for users. Each image should serve a clear purpose, whether to illustrate a point, provide visual interest, or support the textual content. By adhering to these best practices, you can ensure that images on your website enhance the user experience, improve accessibility, and augment overall performance.
HTML Tables
HTML tables display data in a structured, grid-like format, making it easier to organize and present information that is best understood in rows and columns. The foundation of an HTML table is the <table> tag, which encloses all the table elements, including rows, columns, headers, and data cells.
Within the <table> tag, table rows are defined using the <tr> tag (table row). Each row contains table data cells represented by the <td> tag (table data). These <td> elements hold the actual content, such as text, images, or other elements. For example, a simple table displaying a list of items and their prices might look like this:
<table>
<tr>
<td>Item</td>
<td>Price</td>
</tr>
<tr>
<td>Apple</td>
<td>$1.00</td>
</tr>
<tr>
<td>Banana</td>
<td>$0.50</td>
</tr>
</table>
In this example, the table consists of three rows. The first row contains the headers “Item” and “Price,” and the subsequent rows display the corresponding data.
To enhance the readability and structure of a table, table headers can be added using the <th> tag (table header). The <th> tag is similar to the <td> tag but is used explicitly for header cells, often appearing at the top of a column or at the start of a row. Header cells are typically bolded and centered by default to distinguish them from regular data cells. For instance:
<table>
<tr>
<th>Item</th>
<th>Price</th>
</tr>
<tr>
<td>Apple</td>
<td>$1.00</td>
</tr>
<tr>
<td>Banana</td>
<td>$0.50</td>
</tr>
</table>
This table now clearly separates the column headers (“Item” and “Price”) from the data below, making it easier for users to understand the information presented.
Tables can be enhanced with additional elements, such as captions and colspan/rowspan attributes. The <caption> tag provides a title or description for the table, usually placed directly after the opening <table> tag.
The colspan and rowspan attributes allow cells to span multiple columns or rows, respectively, which is helpful for more complex table layouts.
While tables are highly effective for displaying tabular data, they should be used carefully. Overly complex tables can be challenging to read and manage, especially on smaller screens or for users with disabilities. For this reason, it’s essential to keep tables simple and consider using CSS to style and enhance the table’s layout rather than relying solely on HTML.
Lastly, it’s crucial to ensure that tables are accessible to all users. Screen readers, used by visually impaired users, rely on properly structured tables to convey information effectively. Using <th> for headers, adding scope attributes to define row or column headers, and providing descriptive captions make tables more accessible.
In summary, HTML tables are a fundamental tool for presenting structured data on the web. By understanding and correctly applying the basic tags and attributes, you can create clear, readable, and accessible tables that enhance the presentation of your content.
Attributes for HTML Tables
Attributes can be used with the <table> tag to control the appearance, behavior, and accessibility of the table. Some common attributes include border, cellpadding, cellspacing, width, height, and summary. However, it’s important to note that some attributes are deprecated in HTML5, with CSS as the preferred method for styling tables. Below are examples of both deprecated and current attributes:
Deprecated Attributes (Use CSS Instead)
border: This attribute defines the thickness of the border around the table and its cells. For example:
<table border=”1″>
<tr>
<th>Item</th>
<th>Price</th>
</tr>
<tr>
<td>Apple</td>
<td>$1.00</td>
</tr>
</table>
This would create a table with a thin border around each cell. In modern HTML, it’s recommended to use CSS to define borders.
cellpadding: This attribute specifies the space between the cell content and the cell border. For example:
<table border=”1″ cellpadding=”10″>
<tr>
<th>Item</th>
<th>Price</th>
</tr>
<tr>
<td>Apple</td>
<td>$1.00</td>
</tr>
</table>
This adds 10 pixels of padding inside each cell. Again, CSS should be used for padding in modern web design.
cellspacing: This attribute controls the spacing between cells in a table. For example:
<table border=”1″ cellspacing=”5″>
<tr>
<th>Item</th>
<th>Price</th>
</tr>
<tr>
<td>Apple</td>
<td>$1.00</td>
</tr>
</table>
This would create 5 pixels of space between each cell. CSS is now the recommended approach for spacing.
width and height: These attributes set the table’s width and height. For example:
<table width=”50%” height=”200″>
<tr>
<th>Item</th>
<th>Price</th>
</tr>
<tr>
<td>Apple</td>
<td>$1.00</td>
</tr>
</table>
This table would be 50% of the width of its containing element and 200 pixels tall. It’s better to use CSS for these properties as well.
summary: Although this attribute is no longer supported in HTML5, it was previously used to provide a summary of a table’s content for accessibility purposes. Instead, use captions or ARIA attributes for accessibility:
<table summary= “This table lists items and their prices”>
<tr>
<th>Item</th>
<th>Price</th>
</tr>
<tr>
<td>Apple</td>
<td>$1.00</td>
</tr>
</table>
align (deprecated): This was used to set the table’s alignment on the page (e.g., left, right, center), but CSS should be used for this purpose now.
<table align=”center”>
<tr>
<th>Item</th>
<th>Price</th>
</tr>
<tr>
<td>Apple</td>
<td>$1.00</td>
</tr>
</table>
bgcolor (deprecated): This attribute was used to set the background color of the table or table cells. Modern web development should use CSS for background color:
<table bgcolor=”#f2f2f2″>
<tr>
<th>Item</th>
<th>Price</th>
</tr>
<tr>
<td>Apple</td>
<td>$1.00</td>
</tr>
</table>
Modern Approach
As noted earlier, modern HTML practices favor using CSS for table styling rather than relying on these deprecated attributes. CSS provides more flexibility, better control over styling, and ensures consistency across different browsers and devices.
HTML Semantic Elements
Semantic HTML is an approach to web development that uses HTML elements to convey the meaning and structure of content rather than just its appearance. Using semantic elements, developers can create web pages that are more understandable to both humans and machines, including search engines and assistive technologies. Unlike generic elements like <div> and <span>, which provide no information about the type of content they contain, semantic elements clearly define the role and purpose of their content. This not only improves the code’s readability and maintainability but also enhances the website’s accessibility and search engine optimization (SEO).
Some of the most common semantic elements introduced in HTML5 include <header>, <footer>, <article>, <section>, and <nav>. Each of these elements serves a specific purpose in structuring a web page.
<header>
The <header> element represents the introductory content or navigational links of a section or the entire page. It typically contains headings, logos, and other relevant information, such as a site-wide navigation menu. Using <header> clearly delineates the top of a page or section, making it easier for users and search engines to identify the start of a new section or page.
<header>
<h1>Welcome to My Website</h1>
<nav>
<ul>
<li><a href=”#home”>Home</a></li>
<li><a href=”#about”>About</a></li>
<li><a href=”#contact”>Contact</a></li>
</ul>
</nav>
</header>
<footer>
The <footer> element represents the footer of a section or the entire page. It often includes copyright details, links to privacy policies, and contact information. Placing this type of content within a <footer> tag helps users and search engines quickly locate this important, yet typically secondary, information at the bottom of a page.
<footer>
<p>© 2024 My Website. All rights reserved.</p>
<nav>
<ul>
<li><a href=”#privacy”>Privacy Policy</a></li>
<li><a href=”#terms”>Terms of Service</a></li>
</ul>
</nav>
</footer>
<article>
The <article> element is used to enclose a self-contained piece of content that could be distributed or reused independently, such as a blog post, news story, or forum post. Each <article> should make sense on its own and could theoretically be syndicated or embedded in other websites. This element helps search engines and other tools understand that the enclosed content is a distinct, standalone entry.
<article>
<h2>Understanding Semantic HTML</h2>
<p>Semantic HTML is crucial for modern web development…</p>
</article>
<section>
The <section> element defines a section of content that is thematically related but might not be independent enough to be considered an <article>. It commonly groups content under a specific theme or topic within a page. For example, a webpage might have different sections for “Services,” “About Us,” and “Testimonials.” Using <section> helps organize content logically, improving the page’s structure.
<section>
<h2>Our Services</h2>
<p>We offer a wide range of services to meet your needs…</p>
</section>
<nav>
The <nav> element is used explicitly for navigation links, grouping them to indicate their purpose. It helps users and search engines quickly identify a website’s main navigation areas, improving its usability and SEO. The <nav> element should be used only for major navigational blocks, such as the main site menu or sidebar links, rather than for every set of links.
<nav>
<ul>
<li><a href=”#home”>Home</a></li>
<li><a href=”#services”>Services</a></li>
<li><a href=”#contact”>Contact</a></li>
</ul>
</nav>
Benefits of Semantic HTML
By using semantic HTML elements like <header>, <footer>, <article>, <section>, and <nav>, developers can create web pages that are better structured and easier to navigate. These elements provide context and meaning to the content, which is crucial for search engines when indexing pages and for assistive technologies that help visually impaired users understand and navigate the content. Improved accessibility not only ensures more users can interact with the website but also enhances SEO, as search engines prioritize well-organized, clearly marked-up content. In this way, semantic HTML helps create more effective, user-friendly, and search-engine-optimized websites.
HTML Div and Span
In HTML, the <div> and <span> tags are fundamental tools for grouping and styling elements on a web page. Unlike semantic elements such as <header>, <article>, and <section>, which convey specific meanings and roles, <div> and <span> are non-semantic, meaning they don’t inherently carry any particular meaning about the content they enclose. Instead, their primary function is to allow developers to apply CSS styles, manage layout, and group elements together for organizational purposes.
<div> Tag
The <div> (short for “division”) tag is a block-level element, meaning it takes up the full width available and starts on a new line, stacking vertically with other block-level elements. The <div> tag is often used to group larger sections of content or multiple elements into a single unit. For instance, a <div> might contain an entire section of a webpage, such as a header, paragraph, and image, to which specific styles or scripts can be applied:
<div class=”content-section”>
<h2>About Us</h2>
<p>We are a company dedicated to innovation…</p>
<img src=”about-us.jpg” alt=”Our Team”>
</div>
In this example, the <div> tag groups the heading, paragraph, and image together. By assigning a class (class= “content-section”), you can easily style all the elements within this <div> consistently using CSS. The <div> tag is also commonly used in web layouts, where multiple <div>s are used to create grid systems, sidebars, and other structural components of a webpage.
<span> Tag
The <span> tag is an inline element, meaning it does not start on a new line and only takes up as much width as necessary. The <span> tag is typically used to apply styles or scripts to a small portion of text or inline content within a larger text block. Unlike the <div> tag, which is used for larger content blocks, <span> is ideal for targeting individual words, phrases, or other inline elements that require specific styling:
<p>This is an <span class=”highlight”>important</span> piece of information.</p>
In this example, the <span> tag is used to apply a special style (defined by the highlight class) to the word “important” within a paragraph. This allows for precise control over the appearance of specific content without affecting the layout of the entire block of text.
Non-Semantic Nature and Common Use
Both <div> and <span> are considered non-semantic because they do not describe the content they enclose. They provide no information about the meaning or purpose of the content to search engines, screen readers, or other tools. As a result, while <div> and <span> are potent tools for layout and styling, they should be used judiciously, especially when semantic elements are available. Overuse of non-semantic elements can lead to code that is harder to maintain and less accessible.
However, despite their non-semantic nature, <div> and <span> remain indispensable in web design. The <div> tag is commonly used to create flexible layouts, such as grid systems and responsive designs, by grouping content into manageable sections that can be styled and positioned with CSS. The <span> tag, on the other hand, is invaluable for applying targeted styles to specific pieces of text or inline content, enabling a high level of visual design detail on a webpage.
In summary, while <div> and <span> do not add meaning to the content they contain, they are essential HTML elements for structuring, styling, and managing the layout of web pages. By understanding and using their roles appropriately, developers can create well-organized and visually appealing web pages that are easier to style and maintain.
Conclusion
This lesson covers only a few of the many significant elements in HTML5. Refer to this handy “cheat sheet” from HTML.com for a canonical list of HTML elements.